Boarding Actions Rules
Introduction through Mustering Your Boarding Patrol
Introduction
Boarding Actions is an expansion for Warhammer 40,000, offering players of all kinds an exciting and unique way to experience the battles of the 41st Millennium. These simple rules additions will allow you to take your forces deep into the dark interiors and hidden spaces of the war-torn galaxy for both matched play and narrative play.
Featuring pre-set terrain and compact armies, you can dive straight into brutal close-quarters combat quickly, with fast and furious matches often allowing you to play out several battles over the course of a single gaming session.
While many Warhammer 40,000 battles feature large armies clashing on the field of battle, Boarding Actions missions allow you to play out those crucial assaults that can turn the tide of the greater conflict. Boarding Actions armies will also look different to what you might be used to.
Your forces will not have access to the Detachment rules, Enhancements or Stratagems featured in your Codex or Index, but can instead utilise a new range of bespoke options specifically tailored to this deadly form of combat, found both within this book and other publications.
Boarding Actions Terrain
Besides these rules, in order to take your forces out to fight amongst the stars, you will need to pick up a copy of the Warhammer 40,000: Boarding Actions Terrain Set.
This set provides everything that you see here, with a myriad of different wall pieces, hatchways and architectural elements included. In addition, it also contains two fully detailed game boards depicting the crumbling decking and pipework of the ships you are fighting aboard - everything you need to begin battling your way across the void craft of the 41st Millennium.
Boarding Actions Battlefields
Boarding Actions battles involve a series of new components that differ from those you may have used in other games of Warhammer 40,000. Additional details on how to use these can be found below.
Boarding Action Boards
When fighting a Boarding Actions battle, your battlefield will be made up of two Boarding Actions game boards, laid side by side to create the battlefield area. Each mission will contain a mission map that not only shows you the important details required to play that mission, but also shows the layout of the two game boards and how they should be set up. In some missions this will be so that they are touching, but in others, it may require the two game boards to be separated.
Each game board is made up of a series of squares, called Zones, like the one shown below.

These squares will often be used to denote certain areas of the battlefield, most commonly Entry Zones, which are used when setting up your units on the battlefield.
Terrain
Most of the terrain in Boarding Actions games consists of Walls (which includes any attached Pillars), and in amongst these will be Hatchways, which include a Hatch that can be opened. An example of such a piece of scenery is shown below.

Hatchways can be in one of two states: closed or open. When a Hatchway is closed, it will prevent movement and visibility. When a Hatchway is open, models will be able to move freely through it and see through it.


Crusade Battles
Boarding Actions can be used to play battles with your Crusade force in the normal way - your units still have all of their Battle Honours and other upgrades as they would in any other game. However, some of the Agendas found within various publications are not appropriate for Boarding Actions games, either because they reference rules mechanics that do not exist in these battles, such as deployment zones, or because narratively they do not fit within the environment.
We recommend players have a discussion before the game to mutually agree which Agendas from their factions are appropriate for the game they are about to play.
Set Up
Boarding Actions battles use unique terrain to lay out the claustrophobic corridors of the spacecraft where your fights will take place. This terrain is highly modular and can be attached together in a large variety of configurations. If you are playing a Boarding Actions mission, the mission map will also show you where to set up the terrain features, along with the positions of each Hatchway.
Each piece of terrain on the mission map will be coded, allowing you to quickly identify which piece it corresponds to, and where that piece should be positioned on the game boards. You can find a key denoting the code for each piece in Components section. We also recommend painting or writing the codes for each piece onto the underside of that piece - this will allow you to identify them quickly when setting up your game.
When placing these terrain pieces on the game board, the Wall sections line up with the lines between the Zones on the board, and any Pillars line up with the smaller squares in the corner of each Zone, as shown below.

Rules Adaptations
In this section you will find a number of additional rules or amendments to the Core Rules for Warhammer 40,000 that are used when fighting Boarding Action battles.
Boarding Actions is an expansion to Warhammer 40,000. As such, unless otherwise specified on the following pages, all of the Warhammer 40,000 Core Rules apply to battles fought using this expansion. These have been ordered related to the phases of the game they are most relevant to.
Other Supplements
The following documents, all available on warhammer-community.com, have particular relevance to Boarding Actions games.
Mustering Rules
The Boarding Actions Mustering Rules document is the go-to place for the most up-to-date rules you need to put your forces on the battlefield. It includes army construction rules for every faction, as well as any updates to their datasheets to account for the unique constraints of Boarding Actions games. Here are the faction specific detachments for boarding actions.
- Adepta Sororitas
- Adeptus Custodes
- Adeptus Mechanicus
- Aeldari
- Astra Militarum
- Chaos Daemons
- Chaos Space Marines
- Death Guard
- Emperor's Children
- Drukhari
- Genestealer Cults
- Grey Knights
- Imperial Agents
- Leagues of Votann
- Necrons
- Orks
- Space Marines
- T'au Empire
- Thousand Sons
- Tyranids
- World Eaters
Before the Battle
Deep Strike Ability
Players decide whether units with this ability are placed into Reserves at the start of the Deploy Armies step, instead of in the Declare Battle Formations step. In addition, at least half the units in a players army must be set up normally and cannot be placed into Reserves using this rule.
During the battle, unless specified otherwise, players can only set up units from their army on the battlefield using this ability in the second and third battle rounds, and when doing so, cannot set up more than one unit per battle round in this manner. Any units placed into Reserves using this ability that are not set up by the end of the third battle round are considered to be destroyed.
Movement Phase
Impassable Terrain and Other Models
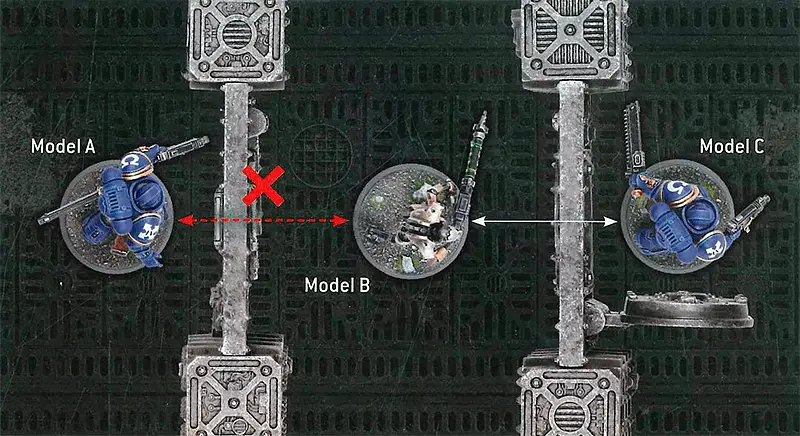
Walls, closed Hatchways and other models are considered impassable, meaning models cannot move through or end a move overlapping them.

Impassable Terrain: Model A and Model B are 5" apart, as the Wall cannot be measured through (indicated by the dashed red line).
Open Hatchways
Models can move through open Hatchways without hindrance, even if their base is wider than that of the Hatchway, but a model cannot end a move with its base in the middle of an open Hatchway. The Hatch of an open Hatchway is ignored for all purposes.

Hatchways: Model A and Model B are 5" apart, as the Hatchway on the left is closed and so must be measured around (indicated by the white lines). However, the Hatchway on the right is open and so is measured through.
Measurement
When measuring the distance between two points, you cannot measure through Walls or closed Hatchways - instead you must measure the closest path around these. If you cannot trace a path between two points, they are considered to be an infinite distance apart.
Engagement Range
When measuring through an open Hatchway, while a model is within 2" horizontally of an enemy model, those models are within Engagement Range of each other.

- Both Models B and C are within Engagement Range of Model A, as the shortest distance between them passes through an open Hatchway and they are within 2" of Model A.
- However, Model D is not within 2" of Model A, so these two models are not within Engagement Range of each other.
Scouts Ability
All units lose the Scouts ability and cannot gain it through any means.
Deployment
Each player will have one or more deployment zones called Entry Zones. Each time a unit is set up, it must be set up wholly within one of your Entry Zones. If a unit will not fit wholly within an Entry Zone, all of its models must be set up as close to the centre of that Entry Zone as possible.
In the Deploy Armies step, you can set up a maximum of one unit without the CHARACTER keyword and a maximum of one unit with the CHARACTER keyword in each Entry Zone. Each time a unit is set up using an Entry Zone, if every model in that unit has the Infiltrators ability, that unit can instead be set up anywhere on the battlefield wholly within 6" of that Entry Zone (normal Infiltrators rules do not apply), but counts as having been set up in that Entry Zone.
During the battle, you cannot set up a unit within an Entry Zone if any other unit is within that Entry Zone. Rules that prevent a unit from being set up within a specific distance of another model or unit cannot prevent a unit from being set up within an Entry Zone.
Deep Strike Ability
Each time a model with this ability is set up on the battlefield using this ability, when measuring the horizontal distance to enemy models, Walls and closed Hatchways are ignored. This also applies to abilities that prevent units from being set up using the Deep Strike ability.

Deep Strike Ability: The TERMINATOR model cannot be deployed to the position on the right using the Deep Strike ability, as while normally when measuring the distance between two points we would measure around Walls and closed Hatchways (thereby making the distance greater than 9" and valid for deployment), for the purpose of the Deep Strike ability these terrain features are ignored, meaning that this position would be considered to be within 9" of the enemy models and therefore invalid.
The deployment position at the top is valid, however, as it is more than 9" away from the enemy models while ignoring the Walls and Hatchway.
Opposite Sides of a Hatchway
If the shortest line between two models would pass through a Hatchway when it is opened, regardless of whether or not it is open at the time, then those models are said to be on the opposide sides of that Hatchway from one another. If every model in a unit is on the opposite side of a Hatchway from every model in another unit, then those units are said to be wholly on the opposite sides of that Hatchway from one another.

Models on Opposite Sides of a Hatchway: In this example, Model C is on the opposite side of the Hatchway from Model A, as the shortest distance between them passes through the open Hatchway. This is not the case for Models A and B, however. As such, the Necrons unit is not wholly on the opposite side of the Hatchway from the Space Marines unit.

Units on Opposite Sides of a Hatchway: In this example, although the Hatchway is closed, the shortest distance between Model A and Models B and C would pass through the Hatchway if it was opened. Not only does this mean that each Necrons model is on the opposite side of the Hatchway from Model A, but their unit is also considered wholly on the opposite side of the Hatchway from Model As unit.
Flying
While on the battlefield, models lose the Fly keyword if they have it, and cannot Fly. In addition, at the start of the battle, if their Move characteristic is greater than 9", it is reduced to 9".
Objective Markers
Models can move over objective markers as if they were not there, and they can end a move on top of an objective marker. A model is within range of an objective marker if it is within 1" horizontally of that objective marker.
Operating Hatchways
At the end of the Move Units step of each players Movement phase, one or more units from that players army (excluding units that are within Engagement Range of one or more enemy models) can attempt to operate one Hatchway each. For a unit to do so, that player must select a Hatchway within 1" of their unit. If there are any enemy units on the opposite side of and within 1" of that Hatchway, their opponent can choose for one of those enemy units to try to prevent that Hatchway from being operated.
If they do, the players roll off, each adding the Toughness characteristic of one of the models from their respective units to their results. If the player attempting to operate the Hatchway wins that roll off, or if their opponent does not try to prevent them from doing so, that Hatchway changes from open to closed or from closed to open, depending on its current state.
If a Hatchway opens and units on opposite sides of that Hatchway now find themselves within Engagement Range of each other, then those units will be eligible to fight during the subsequent Fight phase, but none of those units count as having made a Charge move this turn.
If a rule specifies that a unit from a player’s army can operate a Hatchway, then a unit from the opponent’s army can attempt to prevent it in the normal manner described above. If, however, a rule says explicitly to open or close a Hatchway, then this cannot be prevented.
A Hatchway can never be closed if there are models from the same unit on opposite sides of that Hatchway, no matter the reason.
Operating Hatchways

Before opening the Hatchway, Model A and Model B are not within Engagement Range of one another.

After Model A opens the Hatchway, it is within Engagement Range of Model B as the shortest distance between them passes through an open Hatchway and they are within 2" of one another. In the subsequent Fight phase, both units will be eligible to fight, but Model As unit will not count as having charged that turn.
Shooting Phase
Visibility
A model is visible to an observing model if you can trace a straight line from any part of its base to any part of the observing models base, without that line passing through any of the following:
- A Wall.
- A closed Hatchway.
- A model that is not part of the target models unit.
Note that the Hatch of an open Hatchway does not block any of these visibility lines.
If you can draw a straight line to every part of a model’s base from any part of an observing model’s base, as described above, then that model is said to be fully visible to the observing model.
Visibility around Walls

- Model A cannot see Model B as it is not possible to draw a line from Model As base to Model B’s base without it passing through a Wall.
- Model A can see Model C as a line can be drawn, but part of Model C is still hidden from Model A by the Wall. As such, it will have the Benefit of Cover against ranged attacks made by Model A.
- Model D is fully visible to Model A, so Model D will not have the Benefit of Cover.
Visibility through Hatchways
- Model B cannot see Model A as it is not possible to draw a line from Model B’s base to Model As base without it passing through either a Wall or a closed Hatchway.
- Model B can see Model C as such a line can be drawn through an open Hatchway and Model C is considered fully visible to it.
Visibility through models in the same unit
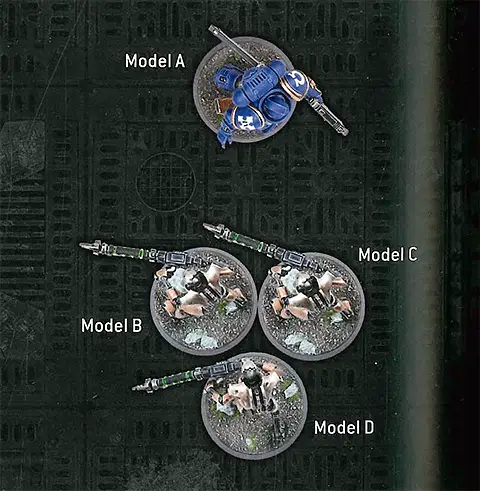
- Models B, C and D are all from the same unit.
- When Model D’s unit is selected to shoot, Model D cannot make any ranged attacks against Model A, as it is not possible to draw a line between their bases without it passing through Models B or C.
- However, when Model A is selected to shoot, because Models B and C are part of the same unit as Model D, Model D is considered visible for the purposes of allocating attacks to it.
- Model D is fully visible to Model A, and so Model D would not have the Benefit of Cover.
Visibility through models in different units
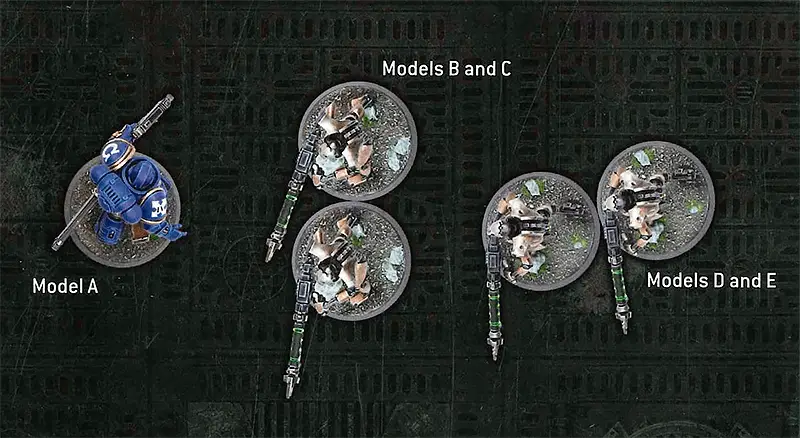
- Models B and C are from one unit. Models D and E are from a different unit.
- When Model A is selected to shoot, it cannot make any ranged attacks against Model D's unit, as it is not possible to draw a line between their bases without it passing through Models B or C, which are not part of Model D’s unit.
Indirect Fire Weapons
While on the battlefield, weapons lose the [indirect FIRE] ability.
Blast Weapons
Each time a model makes an attack with a weapon with the [BLAST] ability, when determining how many models are in the target unit for the purpose of that ability, only count the models that are visible to the attacking model.
Allocating Attacks
When allocating ranged attacks to a model in a unit that has not already lost one or more wounds, that attack must be allocated to a model that is visible to one or more models in the shooting unit. If there is no such model to allocate the attack to, the attack sequence ends.
Benefit of Cover
Each time a ranged attack is allocated to a model, that model has the Benefit of Cover against that attack unless it is fully visible to one or more models in the attacking unit.
Tactical Manoeuvres
At the start of your Shooting phase, you can select one or more units from your army to each perform one Tactical Manoeuvre.
In order for a unit to perform a Tactical Manoeuvre:
- It must not be Battle-shocked.
- It must not be within Engagement Range of one or more enemy models.
- It must not have Advanced or Fallen Back this turn.
- It must not have been set up on the battlefield this turn.
That player can then select one of the following Tactical Manoeuvres for that unit to perform and, until the end of the turn, that unit is not eligible to shoot or declare a charge.
Some mission rules will add new Tactical Manoeuvres that units from your army can perform. When doing so, all of the rules above also apply to those Tactical Manoeuvres.
Secure Site
BATTLELINE units only. Select one objective marker you control that is within range of that unit. At the start of your next Command phase, provided that unit is not Battle-shocked, is still within range of that objective marker, and you still control that objective marker, that unit Seizes that objective marker (see below).
Set to Defend
Until the start of your next Command phase, each time a model in that unit makes a melee attack, add 1 to the Hit roll.
Set Overwatch
Until the end of your opponents next turn, just after an enemy unit is set up or when an enemy unit ends a Normal, Advance or Fall Back move, declares a charge, or opens a Hatchway, your unit can fire Overwatch at that enemy unit.
Each time a unit fires Overwatch, it can shoot as if it were your Shooting phase, but when doing so:
- Models in that unit can only make attacks that target that enemy unit (and only if it is an eligible target).
- Each time a model in that unit makes an attack, an unmodified Hit roll of 6 is required to score a hit, irrespective of the attacking weapons Ballistic Skill or any modifiers.
- Critical Hits are only ever scored on an unmodified Hit roll of 6, irrespective of any other abilities.
- Each unit cannot fire Overwatch more than once per turn.
Seizing and Securing Objective Markers
When a players unit Seizes an Objective Marker, that objective marker is Secured by that player’s army. When an objective marker is Secured by a players army, that objective marker is controlled by that player and remains so, even if they have no models within range of it, until their opponent controls it at the start or end of any turn. Note that some rules allow an army to Secure an objective marker without having a unit actually Seize it.
Charge Phase
Visibility
A unit can only be selected as a target of a charge if it is visible to the charging unit.
Fight Phase
Pile-in and Consolidation Moves
Each time a model makes a Pile-in or Consolidation move:
- It cannot end that move within Engagement Range of a unit that was not visible to its own unit when it started that move.
- It does not need to end that move closer to the closest enemy model, provided it ends that move as close as possible to the closest enemy unit that is visble to its own unit.
In addition, if a unit cannot end these moves within Engagement Range of one or more enemy units and in Unit Coherency, then it also cannot make a Consolidation move towards the closest objective marker.
Leaders
Units with the Leader ability are normally able to be attached to Bodyguard units, starting the battle as a single unit. In Boarding Actions battles this is not the case - Leaders cannot be attached to Bodyguard units and instead remain as their own independent unit for the entire battle.
Leader Abilities
Many Character units have abilities that they confer while attached to a Bodyguard unit, that begin with the phrase 'while this model is leading a unit' or 'while this unit is leading a unit'. Such abilities are called Leader abilities and can still be conferred onto friendly units using the Battlefield Command Stratagem.
When using this Stratagem, you can select one friendly unit that your Leader could normally be attached to; that unit will gain the effects of that Leader ability as if that Leader was attached to it. Note, however, that the Leader cannot itself benefit from such abilities; only the selected unit will benefit.
Example: A WINGED TYRANID PRIME has the following Leader ability:
- Alpha Warrior: While this model is leading a unit, weapons equipped by models in that unit have the [SUSTAINED HITS 1] ability.
The Winged Tyranid Prime can normally be attached to TYRANID WARRIORS WITH MELEE BIO-WEAPONS units. At the start or end of any phase, you can use the Battlefield Command Stratagem to select such a unit that is within 6" of your Winged Tyranid Prime. If you do, until the start of your next Command phase, weapons equipped by models in your TYRANID WARRIORS WITH MELEE BIO-WEAPONS unit have the [SUSTAINED HITS 1] ability.
Once the effect of the Battlefield Command Stratagem has been applied, there is no requirement for the TYRANID WARRIORS WITH MELEE BIO-WEAPONS unit to stay within 6" of that Winged Tyranid Prime.
Leader Abilities


Even though the WINGED TYRANID PRIME and the TYRANID WARRIORS move away from one another, the TYRANID WARRIORS will continue to gain the benefit of the Winged Tyranid Primes Alpha Warrior ability for as long as the Battlefield Command Stratagem allows.
Led-by Abilities
Some units have abilities that take effect while they are being led by a unit with the Leader ability. These typically contain the phrase 'leading this unit' and are called Led-by abilities.
Example: The FULGURITE ELECTRO-PRIESTS unit has the following Led-by ability:
- Electro-infusion: While a CHARACTER model is leading this unit, each time an attack targets this unit, subtract 1 from the Wound roll.
Led-by abilities have no effect in Boarding Actions battles, even if that unit is targeted by the Battlefield Command Stratagem to confer a Leader ability onto it.
Returning Destroyed Models
Rules that return destroyed models to a unit, unless specified otherwise in Boarding Actions missions or Boarding Actions Detachments, cannot return more than one model to a unit per battle round.
Stratagems
You cannot use any Stratagems other than the ones below and those found within Boarding Actions Detachments.
Command Re-roll
1CP
Boarding Actions - Epic Deed Stratagem
A great commander can bend even the vagaries of fate and fortune to their will, the better to ensure victory.
WHEN: Any phase, just after you have made a Hit roll, a Wound roll, a Damage roll, a saving throw, an Advance roll, a Charge roll, a Desperate Escape test, a Hazardous test, or just after you have rolled the dice to determine the number of attacks made with a weapon, for an attack, model or unit from your army.
TARGET: That unit or model from your army.
EFFECT: You re-roll that roll, test or saving throw.
Battlefield Command
1CP
Boarding Actions - Strategic Ploy Stratagem
The commander's authoritative tone cuts through the din of battle, guiding the actions of nearby troops.
WHEN: Start or end of any phase.
TARGET: One Leader unit from your army and one friendly Bodyguard unit within 6" of it that it could normally be attached to.
EFFECT: Select one of your Leader unit’s Leader abilities. Until the start of your next Command phase, that Bodyguard unit is treated as being led by that Leader unit for the purposes of that Leader ability.
RESTRICTIONS: Once you target a unit with this Stratagem, that unit cannot be targeted with it again until your next Command phase.
Counter-offensive
2CP
Boarding Actions - Strategic Ploy Stratagem
In close-quarters combat, the slightest hesitation can leave an opening for a swift foe to exploit.
WHEN: Fight phase, just after an enemy unit has fought.
TARGET: One unit from your army that is within Engagement Range of one or more enemy units and that has not already been selected to fight this phase.
EFFECT: Your unit fights next.
Insane Bravery
1CP
Boarding Actions - Epic Deed Stratagem
Indifferent to their own survival, these warriors hold their ground against seemingly impossible odds.
WHEN: Battle-shock step of your Command phase, just after you have failed a Battle-shock test taken for a unit from your army.
TARGET: The unit from your army that Battle-shock test was just taken for (even though your Battle-shocked units cannot normally be affected by your Stratagems).
EFFECT: Your unit is treated as having passed that test instead, and is not Battle-shocked as a result.
Explosive Clearance
1CP
Boarding Actions - Battle Tactic Stratagem
A well-placed explosive munition in confined shipboard spaces can cause bloody carnage.
WHEN: Your Shooting phase.
TARGET: One unit from your army that has not been selected to shoot this phase.
EFFECT: Select one model in your unit that is equipped with a weapon with the [BLAST] ability. Until the end of the phase, when determining how many models are in the target unit for the purpose of that ability, include models that are not visible to the attacking model. In addition, attacks made with that weapon can be allocated to models that are not visible to the attacking model.